Using the Active Editor
 The 'Active
Editor' (the Editor) is a tabular-like window which lets you freely move
around and modify directory information as easily as if it were in a spreadsheet.
The Editor also supports importing data from delimited text files. Importing
into the Editor is explained in the Importing into
the Active Editor section. However, a thorough understanding
of using the Editor is important before importing is attempted.
The 'Active
Editor' (the Editor) is a tabular-like window which lets you freely move
around and modify directory information as easily as if it were in a spreadsheet.
The Editor also supports importing data from delimited text files. Importing
into the Editor is explained in the Importing into
the Active Editor section. However, a thorough understanding
of using the Editor is important before importing is attempted.
Warnings
The Editor
is one of the most powerful components in Hyena. It should be used
only by personnel familiar with this documentation and in particular,
familiar with the underlying directory attributes that are being updated
and/or imported into. When using the Editor for the first time,
make a few small changes to a few directory objects, save the changes,
and verify that the information was updated to your expectations. When
updating any directory attribute for the first time, repeat this verification
process to ensure that the information changes as expected. This
is particularly important when updating true/false or numeric attributes.
General
Usage
Active
Editor Options and Settings
Global
settings for the Editor are found under Tools
> Settings > Active Editor:
Highlight and select entire row during
navigation - To assist in navigation, the Editor by default will
select and highlight the entire row when a cell (directory attribute)
is selected. Since individual entries are also potentially
being modified, this highlighting can be distracting in some cases. Turn
this option on or off depending on your preference.
Default to Edit Mode when selecting items
- If this option is turned on (the default), the Editor will automatically
enter Edit Mode when any cell is selected. Navigating around the
Editor by using any of the navigation methods will select a new cell;
the Editor will remain in Edit Mode. A new value can simply be entered
or pasted into the selected attribute.
When
this option is turned off, the Editor must be placed into Edit Mode for
any attribute by pressing F2 or double-clicking on the attribute value.
An
'F2' toolbar button is also available in the Editor to change this setting.
Accessing the Editor
The
Editor can be accessed from the context menu of any Active Directory object
that is displayed in the right window. For computer objects, the
Editor option is found on the Directory Functions sub-menu. Select 'Edit with Active Editor...' to
display the selected directory objects in the Editor.
The
Editor can also be accessed through the main Toolbar.
Only
selected items are placed in the Editor.
 The
Editor does not retrieve any data from Active Directory, but instead copies
the current values from the right window query results. To ensure
that the most update-to-date data is being modified, make sure the current
view is refreshed prior to accessing the Editor.
The
Editor does not retrieve any data from Active Directory, but instead copies
the current values from the right window query results. To ensure
that the most update-to-date data is being modified, make sure the current
view is refreshed prior to accessing the Editor.
Setting
up the Editor
The
Editor builds its initial data contents from any Active Directory query
results in Hyena's right window. Since any AD query can be created or
customized in Hyena, you are in complete control over which directory
attributes are displayed and can be modified in the Editor. For more information
on adding and changing Hyena's Active Directory queries, see the Managing
Active Directory Queries topic.
Using
the Editor
See the screen
image below and the lettered sections that follow for Editor usage:

A.
Current Attribute Information - When an attribute is clicked on,
the Editor will display the AD schema information, showing the data type
and any length restrictions placed on the attribute. In the example above,
the employee ID is the 'active' column, and the maximum length of 16 characters
will only be permitted into the employee ID field. If an attribute cannot
be modified, either due to directory restrictions, or limitations of the
Editor, another status line will appear indicating that the attribute
cannot be changed.
B.
Navigation - The Editor can be navigated by either clicking
on any cell, or using one of the various navigation shortcuts:
TAB
/ Shift-TAB - Moves to the next/previous column
Return / Down Arrow - Moves to the next row
Up Arrow - Moves to the previous row
As
the current active column changes the header will indicate whether the
column can be updated.
C. Editing - No editor would be
complete without flexible methods of making changes. An attribute
can be changed by simply changing the value, and pressing Enter, or moving
to another cell. While making changes, shortcuts include:
Control-C
- Copies selected text
Control-X - Cut selected text
Control-V - Paste previously copied text
Control-Z - Undo previous change (while in Edit Mode)
Control-A - Selects all text
Shift F3 - Pressing Shift F3 will change the contents to all lower case,
all upper case, or mixed case on any selected text
F12 - Pressing F12 will restore the previous change
D. Changing Editing Behavior
Auto Edit Mode (F2) - The Editor
can be set to either automatically enter Edit Mode or require a double-click
or F2 to enter Edit Mode.
Auto Select All Mode - The current
value of an attribute can either be selected or the cursor can be placed
at the end of the current value depending on user's preference and the
type of changes being made.
E.
Modification Indicator - When a new value is entered, the Editor
will show a visible write indicator next to the new value as a reminder
that a change was made.
F.
Modification Statistics - Modification statistics are displayed
on the bottom of the window showing the number of unsaved changes, as
well as how many objects (rows) have been modified. After clicking
OK or Commit, a progress bar will be displayed.
G.
Terminal Server Attributes - The Editor supports modification of
Terminal Server (TSE) attributes as well, even though terminal server
(TSE) data is not stored in Active Directory attributes like other directory
information. Note: TSE data can be extremely slow to retrieve and
update. Any directory query including TSE fields should be used
only as needed.
H.
Importing - See the Importing section
below for more information on importing into the Editor.
Other
Features
Resizable Window - The Editor's
window can also be resized, keeping scrolling to a minimum. The
Editor will also remember its previous size when reopened.
Auto Column Resize - A toolbar
button is available to automatically resize all of the columns in the
Editor to fit the contents.
Saving
Changes
Clicking
either the OK or Commit buttons will save all of the changes made in the
Editor. Clicking OK will save these changes and close the Editor.
Clicking the Commit button will save all changes, but leave the
Editor open for additional changes to be made.
Changes must
be Committed before an Import operation can be started.
Once the
Editor is closed, either by clicking OK or Cancel, the current Active
Directory query results in Hyena's right window will be updated to reflect
any changes made in the Editor.
Limitations
and Technical Information
260-Character
Text Display Limit - Windows does not permit text strings longer
than 260 characters to be displayed in list views. Hyena replaces
the end of any text that exceeds this limit with ..!, to indicate that
the display is truncated. The Active Editor, however, allows entry
of text longer than this (or pasting it in), however, upon leaving Edit
Mode for that cell, the display will be truncated if its longer than 260
characters. This limitation only affects the display of the data;
the underlying data will not be truncated. After leaving the Editor
and returning to Hyena's right window display, again, the data may be
truncated visually only.
Multi-valued
Attributes - Due to limitations in the Windows GUI, the Editor
cannot be used to update multi-valued attributes. A possible feature
addition in the future may be to allow importing of multi-valued attributes.
True
/ False Values - When entering boolean (true/false) values into
the Editor, the following characters can be entered:
For
'True' values (English): 1, Yes, True, (Non-English): Oui, Ja, Sí, Vrai,
Wahr, Verdadero
For 'False' values (English): 0, No, False, (Non-English): Non, Nein, Faux,
Falsch, Falso
These
values are not case-sensitive.
Note that when True/False values are returned
from the Editor into Hyena's right window, they may not visually appear
the same as the same data retrieved from the directory. This is
due to differences between how true/false information is presented vs.
stored in the directory. When in doubt, test the results using the
appropriate application which displays the directory Properties for that
object, or the application which uses the directory information. True/False
values are stored in the directory as -1 or 0, but displayed a variety
of ways by applications.
Removing Directory Attributes -
Active Directory does not permit 'blank' or 'NULL' values to be entered
into the directory. Instead, the attribute is removed, thereby making
the contents appear to be blank, when they are actually just missing.
To remove the contents of a directory attribute, simply blank out
its contents; the Editor will automatically remove any attributes from
the directory with blank values.
Importing
into the Active Editor
Warnings
The Active
Editor import function is one of the most powerful components in Hyena.
It should be used only by personnel familiar with this documentation
and in particular, familiar with the underlying directory attributes that
are being updated and/or imported into. When importing data for
the first time, make a few small changes to a few directory objects, save
the changes, and verify that the information was updated to your expectations.
When updating any directory attribute for the first time, repeat
this verification process to ensure that the information changes as expected.
This is particularly important when updating true/false or numeric
attributes.
General
The Editor
supports importing of data for any of the attributes in its window, for
any combination of the directory objects that are displayed, and in any
order. Moreover, the Editor's importing option allows you to select the
directory attribute to match against. For example, if your organization's
Human Resource system identifies users by employee ID, you can identify
that element to be the matching field. If the same import operations are
performed repeatedly, then a template can be created and saved of the
input field order and key field.
Getting
Ready to Import
A complete
understanding of how the Editor handles the import process is very important
prior to performing an import for the first time. Some general Editor
importing rules:
1. The
import file must be a text file with a single character or TAB delimiter
between the input fields.
2. All
fields that are in the import file must be found in the Editor list. The
only exception are items designated as 'user data', which allows extra
fields in the input file; these are ignored/skipped during the import
process. The order of the fields in the import file does not have
to match the order of the attributes in the Editor.
3. Only
directory objects (rows) in the Editor can be updated; each row in the
import file must be matched to exactly one object in the Editor. The
order of the rows in import file does not have to match the order of the
objects in the Editor.
4. One
field in the import file must be designated as the 'match' field, which
is used to match the import data to one object in the Editor. The
match field must be unique to the imported data, and to the corresponding
matching field in the Editor.
Each of these
topics is explained in more detail below.
Active
Editor Import Properties
The Active
Editor Import Properties dialog shown below controls all of the settings
for the import procedure. Each of the options on this dialog are
explained in detail below:

File
Name - Enter the full directory or network path to the file containing
the directory fields to import. Use the Find File or Edit File buttons
to help location or view the contents of the file.
Delimiter
- Select the delimiter character used to separate individual fields in
the import file, either a TAB or a specified character.
Data
Qualifier - The data qualifier is a character that might be used
to enclose data. For example, if a double-quote character is used
as a data qualifier, the incoming input field for a typical full name
might appears as "Joseph Edwards". If a data qualifier
is used, and not set in the import Properties, the qualifier will be treated
as part of the actual import data.
Import
Field Order - The field order for new imports will default to the
entire attribute list in the Editor, as a method of providing a starting
point for setting up the field order. A 'writable' indicator next
to the field name indicates that the Editor will allow this field to be
imported and modified. See 'Rules for
Import Fields' below for specific information on import fields.
The import
file field order must match exactly the order of the fields as defined
in the 'Import Field Order' list. Use the buttons at the bottom
of the field order list to specify the layout of the import data:
Up/Down
- The up/down buttons will change the order of the selected field(s).
Insert - Use the Insert button to display fields not already in the field
list to be added to the field list.
Remove - Remove fields with the remove button.
Insert User Data - If the import file includes fields that are to be ignored,
insert user data separators for each of these fields.
Set Key Field - See the 'Setting a Key
Field' section below for details on using a key field.
Rules for Import Fields
Keep
these simple rules in mind when setting up the import field order and
import data:
1.
Import fields can be in any order; the order of the directory attributes
in the Editor has no relation to the import field order.
2.
Only attributes that are in the Editor can be imported into. For
example, if the import file contains the email address for a group of
user accounts, then the 'E-Mail' attribute (directory name 'mail') must
be part of the attribute list in the Editor.
3.
If additional fields are in the import file that are not part of
the attribute list in the Editor, then designate these fields as user-data
fields. User-data fields will be displayed as a horizontal bar in
the field list.
4.
Only directory objects (rows) in the Editor can be updated in the
import file. For example, if one of the user accounts to be updated
in the import file belongs to "Joseph Edwards", then a matching
entry for "Joseph Edwards" must be found in the Editor. However,
the imported objects (rows) do NOT
have to be in the same order as found in the Editor. See the 'Import Example' below for a simplified
example of these relationships.
5.
Active Directory does not permit 'blank' or 'NULL' values to be entered
into the directory. Instead, the attribute is removed, thereby making
the contents appear to be blank, when they are actually just missing.
To
remove an attribute, a special symbol must be entered for the attribute
in the import data: ~DEL
The
~DEL symbol is not case-sensitive: ~del, ~DEL, and ~DeL are all equivalent.
If a blank value is encountered in the import data for an attribute,
it will simply be ignored. In other words, a blank value for a field
in the import data is assumed to mean "Do Not Update". By
requiring the ~DEL symbol, the import process will know definitively that
a removal operation is required for the directory attribute.
Setting a Key Field
One
of the most important components to importing data using the Editor is
specifying a Key Field, as the Key Field affects many aspects of the import
process. The Key Field is the only mechanism used to match imported
rows to the corresponding directory objects in the Editor.
The
import field identified as the Key Field must be part of the attribute
list in the Editor. The only exception is if the Active Directory
ADsPath variable is used as the Key Field (see Using
the ADsPath as the Key Field section below).
Rules for Key Fields
1. Each row in the import file must have a non-blank
value for the Key Field.
2. One, and only one, corresponding object in
the Editor must have a matching attribute with the same value as the Key
Field. The matching on the Key Field is
NOT case sensitive: E126 and e126 for an employee ID, for example,
are equivalent.
3. More than one row in the import file cannot
have the same value in the Key Field.
4. If the key field itself needs to be updated,
include it in the input field list twice. In the import file, the
key field will be listed twice as well, once with the current value (the
Key Field), and again a second time with the new value.
Using the ADsPath as the Key Field
Each
Active Directory object is identifiable by its directory path, called
the ADsPath. A special symbol, %ADSPATH%, can be inserted in the
field order list that can be associated with the directory path in the
import file. The ADsPath does NOT
have to be one of the attributes for the directory objects in the Editor
if the ADsPath is used as the Key Field in the import file.
 Using
an ADsPath as a match field can be difficult, as it is a long and complex
string, and if special characters are used in some directory fields, Active
Directory will automatically insert additional special characters into
the ADsPath. One method of getting the ADsPath into a file for directory
objects is to use Hyena's Edit > Copy dialog. A special symbol,
%ADSPATH%, can be added to any Active Directory copied data, without the
need to add this column to a directory query.
Using
an ADsPath as a match field can be difficult, as it is a long and complex
string, and if special characters are used in some directory fields, Active
Directory will automatically insert additional special characters into
the ADsPath. One method of getting the ADsPath into a file for directory
objects is to use Hyena's Edit > Copy dialog. A special symbol,
%ADSPATH%, can be added to any Active Directory copied data, without the
need to add this column to a directory query.
Identifying the Key Field
To set
a Key Field, click the 'Set Key Field' button under the Import Field Order
list. The Key Field will be identified by a 'key' symbol next to
the field name.
Import Example
Setting
up an import for the first time can seem like a daunting task. The
following example will help illustrate a simplified import on a couple
of user objects:
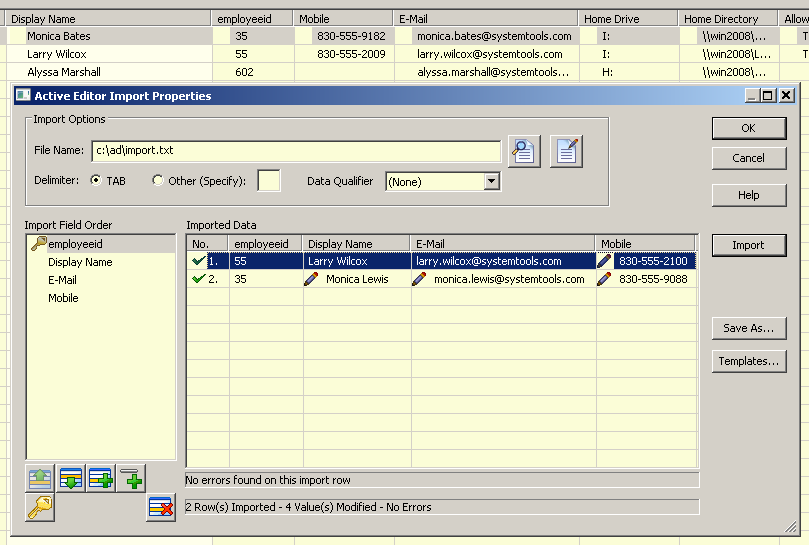
In the example above, multiple user accounts were
selected and displayed in the Editor window (partially visible behind
the Import Properties dialog). The import file, import.txt,
is a TAB-delimited text file with four (4) fields: employee ID, Display
Name, E-Mail, and Mobile. The contents of the import.txt file essentially
look like this:
55<tab>Larry Wilcox<tab> larry.wilcox@systemtools.com<tab>830-555-2100
35<tab>Monica Lewis<tab>monica.lewis@systemtools.com<tab>830-555-9088
Note that the import file only contains two (2)
rows/objects, and that the order of these objects has no relation to the
order in the Editor window.
The 'Imported Data' window is populated with the
contents read from the import file when the Import button is clicked.
The green checkbox next to each row indicates that no errors were
detected in the incoming data.
In the example above, the display name of employee
35 was changed, along with the email address and mobile phone number.
Only the mobile phone number was changed for employee 55. These
changes are indicated by the modification icon. The status bar at
the bottom of the window provides statistics on the import.
Clicking OK will transfer these changes into the
Editor.
Starting the Import
Once
the field order list has been set, click the Import button to start the
import. The fields from the import file will be read and the unsaved
results of the import will be displayed in the' Imported Data' list. The
'Imported Data' list will display each row from the import file, along
with a status indicator:
No
Error - No errors were found on the selected imported row.
Error - An error was found on the imported row. The row or column
that caused the error will be referenced.
The
modification icon will be placed next to any field encountered in the
import file whose value is different than the matching attribute in the
Editor. This aids in illustrating exactly which attributes will
be updated, and which attribute values were found to be identical to the
import fields.
A status
indicator on the bottom of the window will also indicate how many rows
and updated values and/or errors were encountered.
If
any errors are detected, the OK button will be disabled, preventing the
imported changes from being sent to the Editor. The errors can be
found and corrected in the import file, and the Import can be attempted
again.
Completing the Import
Clicking
the Import button only reads and validates the fields in the import file;
new values are only identified and displayed. To actually transfer
the modified fields to the Editor, click the OK button. The imported
changes will then be transferred into the Editor; each modified attribute
will be marked with the modification icon. If a value needs to be
restored to the early value before the import, use the Undo (F12) option
on any modified attribute. To cancel all changes, click the Cancel
button and confirm that all changes should be aborted.
Finally,
to save the imported changes from the Editor into the directory, click
OK or Commit in the Editor dialog.
Using Templates
The
Templates... and Save As... buttons provide access to the Import Templates,
which allow recalling and saving the Import Properties.
Saving a Template
The
Import Properties can be saved into a template using the 'Save
As...' button once an Import is attempted, regardless of whether
or not errors were encountered in the import. This saves time in
re-creating the import field list, key field, and other settings.
Recalling a Template
Use
the 'Templates...' button to restore
a previously saved template. One template can be selected to be
the default template on this dialog as well.
The Default Template
A
default template can be established which will automatically retrieve
all Import Properties immediately when the Import dialog is initially
displayed. Both the Save Template and Recall Template dialogs allow
a default template to be set. Setting a default template does not
prevent another template from being created or restored, it merely sets
the initial settings when the Import Properties dialog is initially displayed.